CIVIL WORKS GUIDELINES FOR MICRO-HYDROPOWER IN NEPAL
67
4.7.4 CANAL EXCAVATION
Once the canal bench has been prepared, the excavation lines
need to be set out as follows:
Place pegs along the centreline and the top and bottom
widths of the canal. The centreline is an imaginary line
that passes through the centre of the canal and parallel to
the sides. Note that the top and bottom widths should
include the side wall thickness as well (i.e. outside edges
of the finished canal).
Join the pegs using thin ropes. Then mark separate lines for
the top and bottom widths (for trapezoidal sections) using
powdered lime or ashes so that they are indicated on the
ground. Note that for rectangular sections, the top and
bottom widths are equal and two parallel lines are sufficient
for the excavation work.
Check the dimensions against the design specifications.
Once the excavation lines have been prepared the canal
should be excavated to the required shape and slope as per
the design. For a rectangular canal, the excavation should
start from the sides down to the required depth. For
trapezoidal sections, the excavation should start at the
central part without exceeding the bottom width lines
vertically down to the required depth. Then the sides should
be excavated without exceeding the top width and meeting
the bottom width at the required depth. Thus, the required
trapezoidal shape can be arrived at. This method of
excavation minimises the use of construction materials
and the need to backfill. Note that, as mentioned earlier,
the side walls of a trapezoidal cement masonry canal are
more likely to crack if constructed on backfill.
It is also helpful to prepare a wooden “former” to check the
cross sectional shape of the canal for trapezoidal shapes.
This involves constructing a wooden frame (using
rectangular sticks) of the required trapezoidal shape.
The canal invert slope should be constantly checked using
a level machine. Note that an inaccurate slope can be very
costly: if the slope is less than required, the canal will not
have the capacity to convey the design flow; if the slope is
steeper than required, the velocity may exceed the
maximum value for the canal type and start eroding it.
4.7.5 CANAL LINING
Once the excavation work has been completed, the actual
construction of the canal can commence. The construction
of the canal depends on the type that has been chosen. For
example, if an earth canal has been chosen, all that is required
is to trim the side walls and bottom width at some places
where the excavation work has been poor. However, if a
masonry canal has been chosen, then this will require
collecting stones, dressing/sizing them and then placing
them at the excavated surface according to the design. For
stone masonry in cement mortar, the following is
recommended: For stone masonry in cement mortar, the
following is recommended:
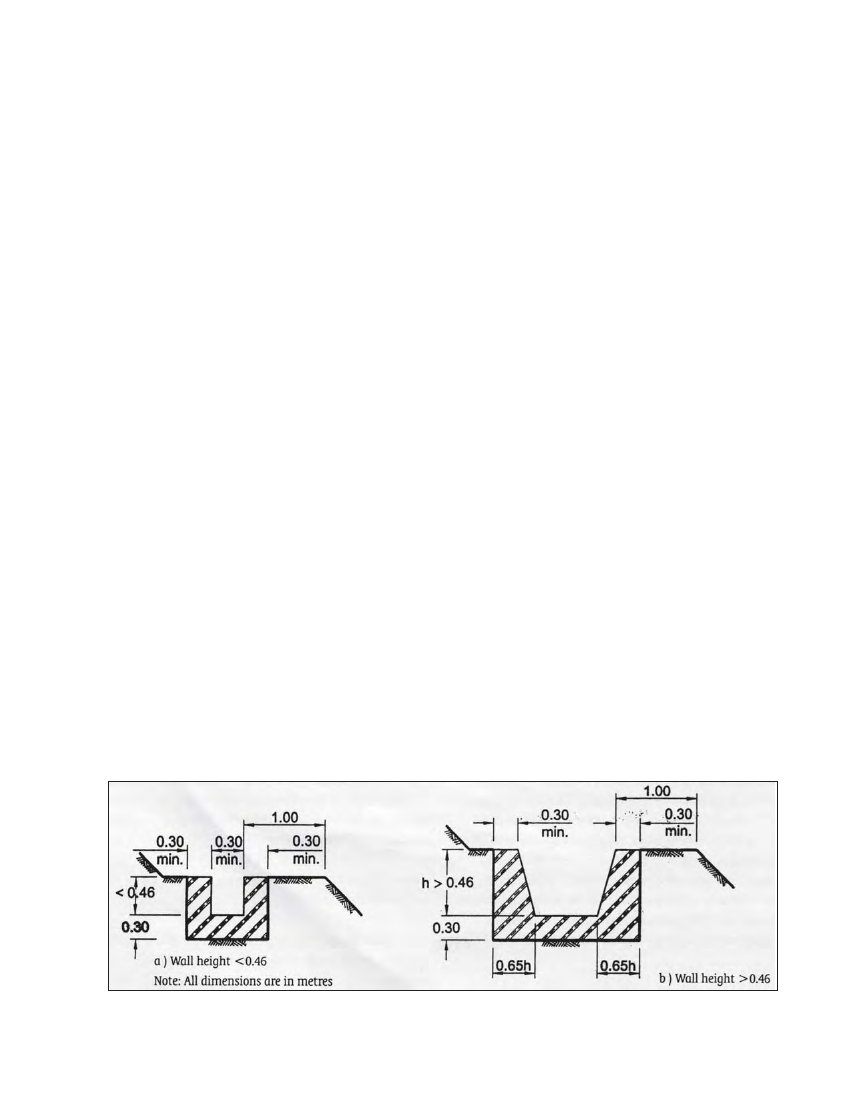
The minimum thickness for bed and side walls should be
300 mm, since thinner walls require more stone work
(dressing and sizing) and may not have the required
strength. This also applies to stone masonry in mud mortar
canals. Recommended designs are shown in Figure 4.13.
Sand used for preparation of the mortar should be clean
and free from organic materials and fine particles. The
sand particles should be granular (like ordinary sugar)
and not flaky. Sand mixed with fine particles should be
thoroughly washed before use. The ratio of the mortar
should not be less than 1 part cement to 4 parts sand by
volume (1:4 cement/sand mortar). This applies to all water
retaining structures such as the settling basin and the
forebay tank. The stones should be wetted before
construction (dry stones absorb water from the cement
mortar, stopping it reach full strength).
1:3 cement sand mortar may be used for plasterwork in the
headrace canal and other water retaining structures such
as the settling basin and the forebay. Plastering the canal
lining is normally unnecessary, but could be used to reduce
hydraulic losses (refer to Table 4.1) or where seepage is
occurring in badly constructed masonry. The thickness of
the plaster should be about 12 mm (1/2 inch).
Immediately after the construction of a cement masonry
portion of the canal length, it should be kept moist for at
least four days. This is called curing and is done by gently
pouring water on the walls of the canal. The use of hessian
Figure 4.13 Canal lining with stone masonary in cement mortar