Photoshop Basics
Doing More with Layers
Layer masks
Sometimes you may want only certain parts of a layer to be visible. For example, you might want to remove the background from a layer so the layers below it can show through. While you could use the Eraser tool to remove the parts you don't want, this type of destructive editing may be difficult to undo. Fortunately, layer masks allow you to show and hide parts of any layer in a nondestructive way.
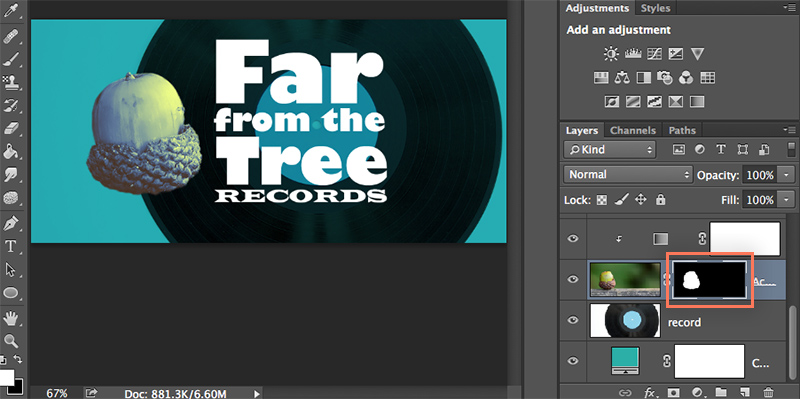
Creating a layer mask can be a bit complicated, so let's start by looking at one that's already finished. If you're following along with the example file, select the Acorn layer. Here, we used a layer mask to hide, or mask out, the background—the acorn is the only part of the layer that's visible. The layer mask is represented by the black-and-white thumbnail to the right of the layer icon in the Layers panel. Notice how the areas that are visible in the document window correspond with the white area on the layer mask thumbnail:

The important thing to recognize here is that the background of the Acorn layer hasn't actually been removed—it's just hidden. If we ever wanted to show more of the original image, we could edit or even remove the layer mask.
To edit a layer mask:
To better understand how layer masks work, let's try editing the the Acorn layer mask. We'll be using the Brush tool, so if you've never used it before you should first read our extra on Working with Brushes.
- Select the layer mask thumbnail in the Layers panel. In our example, we'll select the thumbnail next to the Acorn layer.
- Next, choose the Brush tool from the Tools panel, then set the Foreground Color to white.
- Click and drag your image to reveal areas in the layer. In this example, we're revealing more of the background by adding white paint to the layer mask.

- Set the Foreground Color to black, then click and drag your image to hide areas in the layer.
- Continue using the Brush tool until you're satisfied with the result.
You'll need to take your time and work carefully to get the best possible result, especially when refining the edges of the layer mask around an object. It may be helpful to adjust the size, hardness, and opacity of the Brush tool.
To create a new layer mask:
Now that you know more about layer masks, you may want to try creating your own.
- Select a layer, then click the Layer Mask button
 at the bottom of the Layers panel. In our example, we'll create a new layer mask for the record layer.

- The layer mask will appear as a white thumbnail next to the layer icon in the Layers panel. You can then select the thumbnail and use the Brush tool to edit the layer mask.

Note that you can apply multiple layer masks to the same layer. However, this can become complicated, so we recommend using only one layer mask per layer.
Using layer masks with adjustment layers
You can use a layer mask to control which areas of your image are affected by an adjustment layer. For example, if you have a black and white adjustment layer, you could use a layer mask to convert specific areas to black and white while leaving other areas unaffected.
Every adjustment layer has a layer mask by default, so you won't need to create a new one. You can simply click the layer mask and then use the Brush tool to edit it.
To remove a layer mask:
- Click and drag the layer mask thumbnail to the Trash Can in the lower-right corner of the Layers panel.
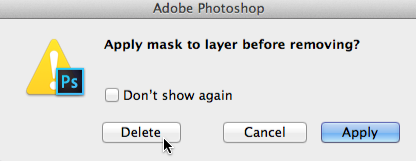
- A dialog box will appear. Choose Delete to remove the layer mask. Choosing Apply will actually remove the parts of the layer that are currently hidden, so you'll want to avoid this option unless you're absolutely sure that you no longer need those parts of the image.

You can also press and hold the Shift key and then click the thumbnail to temporarily disable the layer mask.
Creating and editing layer masks can be a challenging task, and there are many other methods for achieving good results. If you want to learn more, check out these tutorials:
- Mask Out Part of an Image (Adobe)
- A Complete Beginner's Guide to Masking in Photoshop (Design Shack)


