Photoshop Basics
Doing More with Layers
Clipping masks
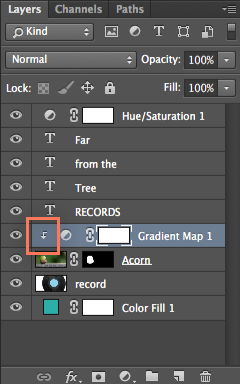
Earlier in this tutorial, we talked about using adjustment layers to correct your images. By default, adjustment layers will affect all layers below them. However, there may be times when you only want an adjustment layer to affect one layer. To do this, you can use a clipping mask.
If you're following along with the example file, locate the small arrow next to the Gradient Map layer. This indicates that a clipping mask has been applied, which limits the adjustment layer to just the Acorn layer below.

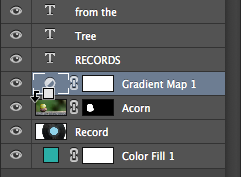
To apply a clipping mask, press and hold the Alt key on your keyboard (or Option on a Mac), then click between the desired layers in the Layers panel. In this example, we're clicking between the Gradient Map and Acorn layers.

You can also use this method to release a clipping mask. Releasing a clipping mask does not delete the layer, but it causes it to behave like a normal layer. For example, if you release the clipping mask for the Gradient Map layer in the example file, it will affect the color of all of the layers below it instead of only affecting the Acorn layer.
It's also important to note that you can apply a clipping mask to multiple adjustment layers above the same layer. For this reason, if you're already using clipping masks in your document, new adjustment layers may use a clipping mask automatically.
Open the example file. Select the Acorn layer, then add a Curves adjustment layer. Make sure a clipping mask is applied to the new layer, then modify the curves in the Properties panel. Notice how the curves adjustments only affect the Acorn layer. Next, try reducing the opacity of the adjustment layers to 70%.
If you want to learn more about using clipping masks, check out this video tutorial on the Adobe website.


