Composting tips
Contents
Composting
Composting turns household wastes into valuable fertilizer and soil organic matter.
In Your Backyard
All organic matter eventually decomposes. Composting speeds the process by providing an ideal environment for bacteria and other decomposing microorganisms. The final product, humus or compost, looks and feels like fertile garden soil. This dark, crumbly, earthy-smelling stuff works wonders on all kinds of soil and provides vital nutrients to help plants grow and look better.
Decomposing organisms consist of bacteria, fungi, and larger organisms such as worms, sow bugs, nematodes, and numerous others. Decomposing organisms need four key elements to thrive: nitrogen, carbon, moisture, and oxygen. For best results, mix materials high in nitrogen (such as clover, fresh grass clippings, and livestock manure) and those high in carbon (such as dried leaves and twigs). If there is not a good supply of nitrogen-rich material, a handful of general lawn fertilizer will help the nitrogen-carbon ratio. Moisture is provided by rain, but you may need to water or cover the pile to keep it damp. Be careful not to saturate the pile. Turning or mixing the pile provides oxygen. Frequent turning yields faster decomposition.
Getting Started
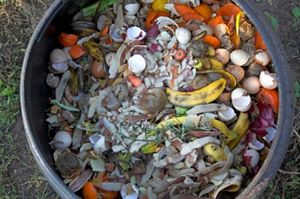
Many materials can be added to a compost pile, including leaves, grass clippings, straw, woody brush, vegetable and fruit scraps, coffee grounds, livestock manure, sawdust, and shredded paper. Do not use diseased plants, meat scraps that may attract animals, and dog or cat manure which can carry disease. Composting can be as simple or as involved as you would like, and depends on how much yard waste you have, how fast you want results, and the effort you are willing to invest.
Cold or Slow Composting
With cold or slow composting, you can just pile grass clippings and dry leaves on the ground or in a bin. This method requires no maintenance, but it will take several months to a year or more for the pile to decompose. Cold composting works well if you are short on time needed to tend the compost pile at least every other day, have little yard waste, and are not in a hurry to use the compost. Keep weeds and diseased plants out of the mix since the temperatures reached with cold composting may not be high enough to kill the weed seeds or disease-causing organisms. Add yard waste as it accumulates. Shredding or chopping speeds up the process. To easily shred material, run your lawn mower over small piles of weeds and trimmings. Cold composting has been shown to be better at suppressing soil-borne diseases than hot composting. Cold composting also leaves more undecomposed bits of material, which can be screened out if desired.
Hot Composting
Hot composting requires more work, but with a few minutes a day and the right ingredients you can have finished compost in a few weeks depending on weather conditions. The composting season coincides with the growing season. When conditions are favorable for plant growth, those same conditions work well for biological activity in the compost pile. However, since compost generates heat, the process may continue later into the fall or winter.
Hot piles do best when high-carbon material and high-nitrogen material are mixed in a 1 to 1 ratio. A pile with the minimum dimensions of 3' x 3' x 3' is needed for efficient heating. For best heating, make a heap that is 4 or 5 feet in each dimension. As decomposition occurs, the pile will shrink. If you don't have this amount at one time, simply stockpile your materials until a sufficient quantity is available for proper mixing.
Hot piles reach 110 to 160 degrees Fahrenheit, killing most weed seeds and plant diseases. Studies have shown that compost produced at these temperatures has less ability to suppress diseases in the soil since these temperatures may kill some of the beneficial bacteria necessary to suppress disease.
Steps:
- Choose a level, well-drained site, preferably near your garden.
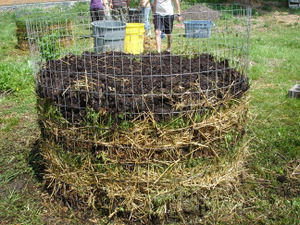
- There are numerous styles of compost bins available depending on your needs. These may be as simple as a movable bin formed by wire mesh or a more substantial structure consisting of several compartments. There are many commercially available bins. While a bin will help contain the pile, it is not absolutely necessary. You can build your pile directly on the ground. To help with aeration, you may want to place some woody material on the ground where you will build your pile.
- To build your pile, either use alternating layers of high-carbon and high-nitrogen material or mix the two together and then heap into a pile. If you alternate layers, make each layer 2 to 4 inches thick. Some composters find that mixing the two together is more effective than layering. Use approximately equal amounts of each. If you are low on high-nitrogen material, you can add a small amount of commercial fertilizer containing nitrogen. Apply at a rate 1/2 cup of fertilizer for each 10-inch layer of material. Adding a few shovels of soil will also help get the pile off to a good start; soil adds commonly found decomposing organisms.
- Water periodically. The pile should be moist but not saturated. If conditions are too wet, anaerobic microorganisms (those that can live without oxygen) will continue the process. These are not as effective or as desirable as the aerobic organisms. Bad odors also are more likely if the pile is saturated.
- Punch holes in the sides of the pile for aeration.
- The pile will heat up and then begin to cool. Start turning when the pile's internal temperature peaks at about 130 to 140 degrees Fahrenheit. You can track this with a compost thermometer, or reach into the pile to determine if it is uncomfortably hot to the touch.
- During the composting season, check your bin regularly to assure optimum moisture and aeration are present in the material being composted.
- Move materials from the center to the outside and vice-versa. Turn every day or two and you should get compost in less than 4 weeks. Turning every other week will make compost in 1 to 3 months. Finished compost will smell sweet and be cool and crumbly to the touch.
Common Problems
Composting is not an exact science. Experience will tell you what works best for you. If you notice that nothing is happening, you may need to add more nitrogen, water, or air. If things are too hot, you probably have too much nitrogen. Add some more carbon materials to reduce the heating. A bad smell also may indicate too much nitrogen.
Cold composting often proceeds faster in warmer climates than in cooler areas. Cold piles may take a year or more to decompose depending on the materials in the pile and the conditions.
Adding kitchen wastes to compost may attract flies and insects. To prevent this problem, make a hole in the center of your pile and bury the waste. Do not compost meat scraps, dead animals, pet manure, diseased plant material, or noxious weeds.
Check on any local or state regulations for composting in urban areas--some communities may require rodent-proof bins.
Vermicomposting
|
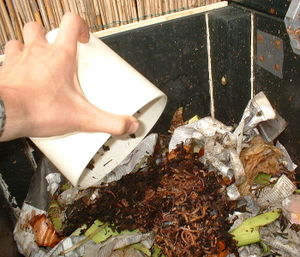
Vermicomposting uses worms to compost. This takes up very little space and can be done year-round in a basement or garage. It is an excellent way to dispose of kitchen wastes. Steps:
|
- Provide worms with food wastes such as vegetable peelings. Do not add fat or meat products. Limit feed -- too much at once may cause the material to rot.
- Keep the bin in a dark location away from extreme temperatures.
- In about 3 months the worms should have changed the bedding and food wastes into compost. At this time add fresh bedding and more food to the other side of the bin. The worms should migrate to the new food supply.
- After a couple of weeks, open your bin in a bright light. The worms will burrow into the bedding. Scoop out the finished compost and apply to your plants or save for use in the spring.
Using Compost
Compost can be used for all your planting needs. Compost is an excellent source of organic matter to add to your garden or potted plants. It helps improve soil structure which contributes to good aeration and moisture-holding capacity. Compost is also a source of plant nutrients.
Compost can also be used as a mulch material. Studies have shown that compost used as a mulch, or mixed with the top one-inch layer of soil, can help prevent some plant diseases, including some of those that cause damping of seedlings.
On the Farm
On the farm, potential waste is turned into a resource that saves money and helps the environment. Producers use livestock manure to fertilize crops. When manure is properly handled, it can be safely applied to the land without the risk of polluting water. Composting is also practiced in some poultry operations. The compost is used as fertilizer on the farms and for lawns and gardens.
The Natural Resources Conservation Service, National Association of Conservation Districts, and Wildlife Habitat Council encourage you to sign up in the “Backyard Conservation” program. To participate, use some of the conservation practices in your backyard that are showcased in this series of tip sheets -- tree planting, wildlife habitat, backyard pond, backyard wetland, composting, mulching, nutrient management, terracing, water conservation, and pest management. Then, simply fill in the Backyard Conservation customer response card, send a Backyard e-mail request to landcare@usda.gov, or call 1-888-LANDCARE.


