OS X Mountain Lion
Everyday Tasks
Getting to know Calendar
As you already know, the Calendar app is different on each device—but there are many similarities when it comes to basic tools and features. Use the interactive below to learn how to perform several common tasks in the iPad version.
New Event
Use this button to create a new calendar event. You can also press and hold a time slot on your calendar.
New Event
Press and hold a time slot to create a new calendar event. You can also use the + button in the bottom right corner.

View/Edit Event
Tap to view or edit an event.
Navigation Options
There are many different ways to navigate your calendar. Look to the options at the bottom to quickly jump to a different day, week, month, or even year. The options will vary depending on your current view.
Today
Tap Today to quickly jump to today's events, no matter where you are in your calendar.
Day
Change your calendar view to Day. This option is useful for viewing your full schedule (from morning to night) one day at a time.
Invitations
When someone invites you to one of their events, you'll be notified here. If you choose Accept or Maybe, the event will be added to your calendar.
Calendars
Here, you can manage all your different calendars, including calendars that are synced from other services, and calendars that you've created yourself.
Search
Here, you can search for events by keyword. You can even enter a friend or coworker's name, and find events that include them as an invitee (or inviter)
List
Change your calendar view to List. This allows you to view your schedule and a list of your events side by side.
Year
Change your calendar view to Year. From here, you can easily navigate to a specific day.
Month
Change your calendar view to Month (currently pictured).
Week
Change your calendar view to Week. This option is also useful for viewing your full schedule—but this time, for an entire week.
To create a new calendar event:
- Tap the
 button, or press and hold a time slot on your calendar.
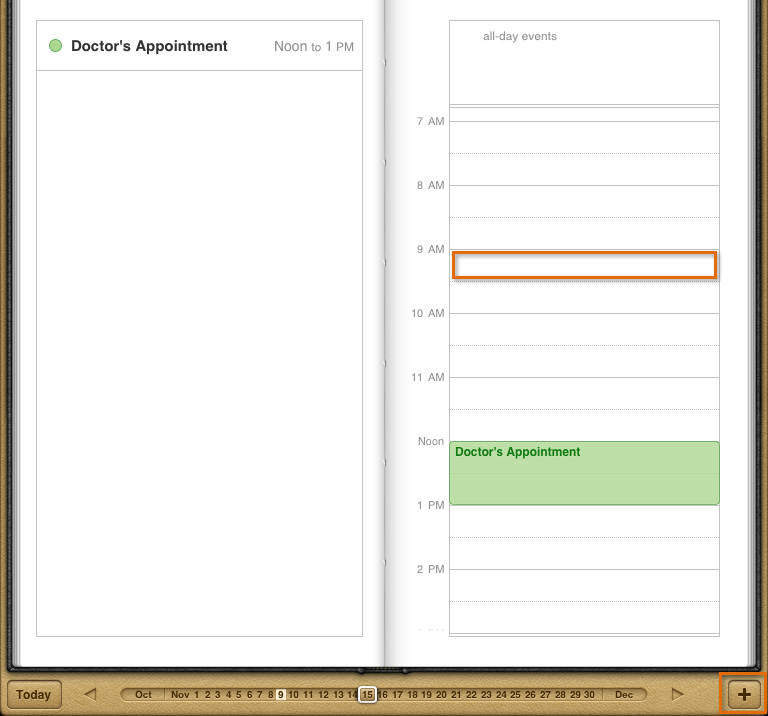 Creating a new calendar event
 - The event details will appear.
- Add as much or as little information as you want. Remember to tap Done when you're finished.
Use the interactive below to learn more about event details.
Notes
Use this field to add notes about the event. You can enter whatever you like.
URL
Here, you can attach a link to the event. This option is especially useful if the event is a webinar—that way, invitees will know where to go.
Title and Location
Give the event a title that will make it easy to reference on your calendar. You can also list a location if you want.
Invitees
If your friends or colleagues are using a compatible calendar (iCloud, Microsoft Exchange, or CalDAV), you can invite them to the event too. If they accept, the event will be added to their calendar.
Alert
Use this option to set an alert for the event. You can choose a few minutes or even a few days in advance.
Calendar
If you have multiple calendars (for example, one for work, and one for your personal schedule), you can decide where to add the event.
Remember, each calendar is color-coded, so you'll be able to tell the events apart.
Availability
Set your availability as busy or free. Busy identifies the time as reserved if someone else tries to invite you to one of their events.
Time
Tap to fine-tune the date and time for your event. Choose All-day if you want to reserve the entire day on your calendar.
Repeat
Here, you can control whether or not the event is going to repeat in the future. This is a great way to schedule recurring meetings and appointments.
Cancel
Tap Cancel to close the event without saving.
Done
Tap Done to save.

Insider tips
Once you know your way around the app, consider these tips for getting the most out of Calendar.
Calendar alerts
If you've set up an alert for one of your calendar events, your device can notify you in several different ways depending on your settings. By default, you should receive at least a pop-up alert. Visit the app's settings to customize your notifications or set up even more alerts.
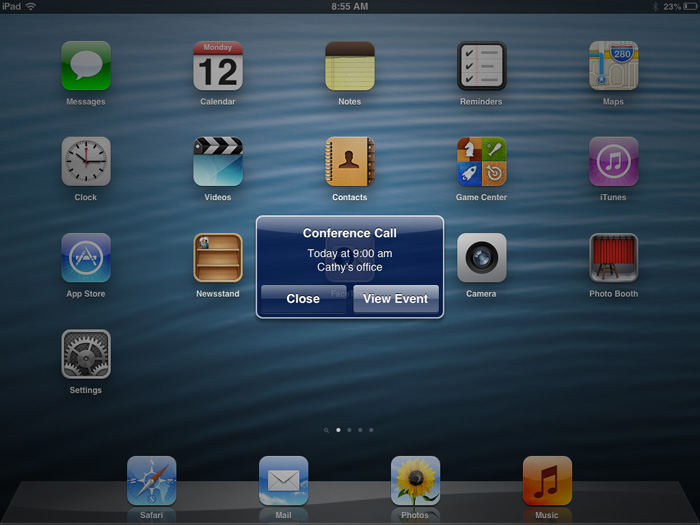 Calendar notifications
Adding new calendars
If you're an especially busy person, you may want to create separate calendars for the different things that occupy your time. For example, you could create a calendar for work or a calendar for keeping track of your personal schedule. Each calendar will be color-coded in the app so you can easily tell them apart.
To create a new calendar, tap Edit under Calendars. Then choose Add Calendar and follow the app's instructions.
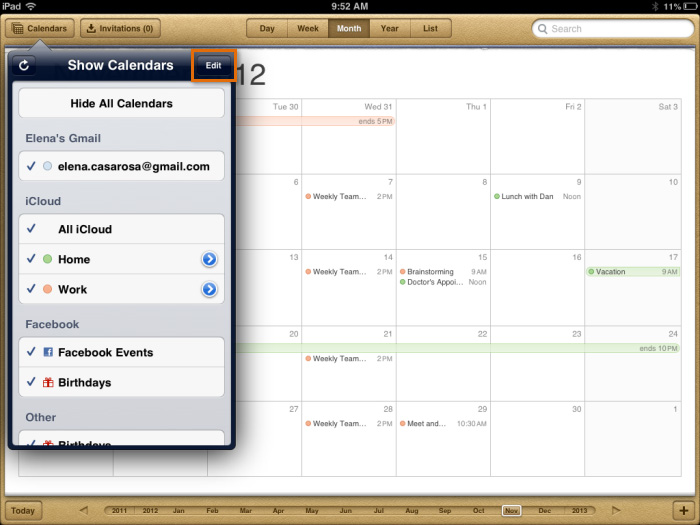 Managing your calendars
Syncing other calendars
If you already have a calendar with another service—for example, Google, Yahoo!, Hotmail, or Outlook—you can sync it with the Calendar app. This will allow you to add, edit, and delete events all in one place so you don't have to visit each calendar separately.
You may have even synced your calendar already, if you've already set up the Mail app. To find out if this is the case, navigate to Mail, Contacts, and Calendars in your device's settings, then review your list of accounts. If your account is synced (including your calendar), it will be indicated here. To add a new account, tap Add Account.
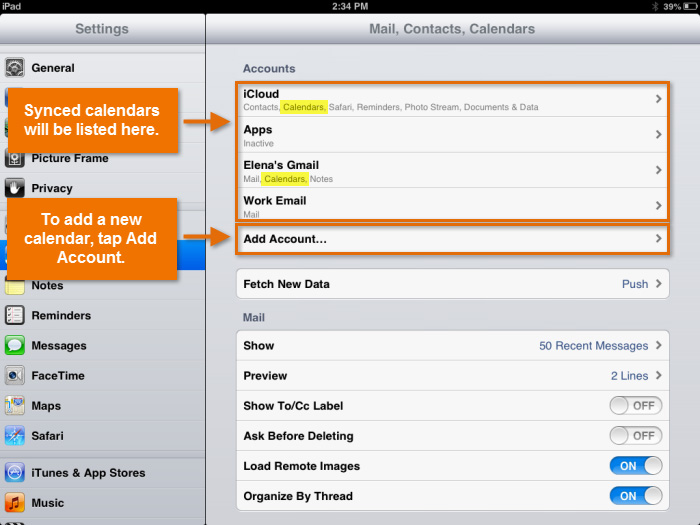 Managing synced calendars
How well syncing works for you will depend on your particular calendar. For example, if you have multiple calendars tied to one Google account (for work, school, or other activities), they may not all sync properly. We recommend giving this feature a try, and with that in mind paying special attention to whether or not your information is syncing.
Siri
If you have Siri on your device, it works well with the Calendar app. Try asking it to create events for you instead of performing the task yourself. For example, you could say, "Add book club meeting next Saturday on the 24th at 2:00". Siri will transcribe the event (including the date and time) and add it to the app.
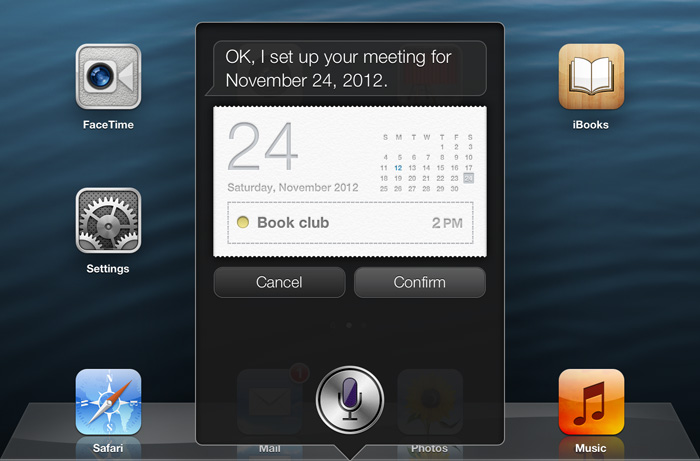 Using Siri to create a calendar event


