Back
Back

|
Composting
Local names:
Mboji (Swahili)
Method:
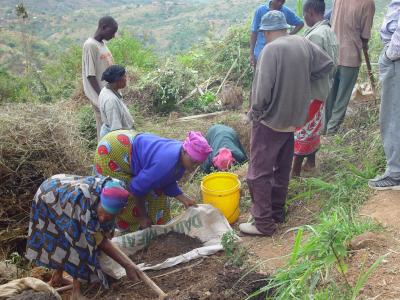
Piling up crop and other farm wastes to make them decompose quickly
Tool requirements:
Shovels and pick axes for excavation
Site requirements:
Shaded places and availability of composting materials:
Various types of vegetative material, topsoil, animal manure, wood ash, water.
Potential to increase productivity:
Productivity improvements recorded as high as 60-80% increased yields.
|
Introduction
Compost is used as an organic fertiliser which can be added to the soil. Manuring with compost maintains the soil structure and adds nutrients to the soil. A good soil structure ensures improved circulation of water, air and nutrients. It is good for soil life and plant growth. Adding compost to sandy soils increases the water retention capacity. Other uses of compost include erosion prevention, potting soil, mushroom growing and fish feed.
How does it work?
Composting means piling up crop and other farm wastes in layers to make them decompose quickly. It is a bio-chemical process in which micro-organisms decompose organic waste matter (crop residue, kitchen wastes, cowdung, urine) into a soil-improving product. The final product is a uniform, black mass of rotten, nutrient-rich manure. Composting is done to produce an organic fertiliser that is balanced in plant nutrients. This organic fertiliser, known as humus, improves soil fertility, moisture retention and soil aeration.
Compost can be used in all soils with low fertility. It is especially good in areas that have low rainfall, where artificial fertilisers cannot be used effectively because of lack of moisture. It is also useful in sandy soils which have poor water-holding capacity. Compost improves the structure and drainage of all soils.
What are the advantages of composting?
- Large amounts of vegetation, such as crop remains, garden weeds, kitchen and household wastes, hedge cuttings, garbage, etc, are put to use.
- When properly made, compost becomes immediately available as plant food without the need to be first broken down by soil microorganisms.
- Compost does not cause excessive weed growth, as is the case with ordinary farm manure.
- Good crops can be obtained without the need for extra chemical inputs.
- All farmers, regardless of their financial abilities, can make and use compost.
What are the disadvantages?
- Compost requires a lot of labour and time to prepare and to spread it over the farm.
- The nutrient composition of the compost varies a great deal. It depends on the materials used and the preparation methods (see Using organic matter).
- Low availability of vegetation to make compost in drier areas.
Notice: Compost and farmyard manure are major sources of weed seeds. Weed seeds withstand partial decomposition. Therefore put only fully decomposed compost and farmyard
Composting methods
This method is suitable for areas with high rainfall. For low-rainfall areas, use the pit method (described later)
1. Select a location close to where you want to use the compost. The place should be sheltered from the wind, rain, sun and runoff. A compost pile must not get either very dry or very wet.
2. Measure a rectangle 120 cm (4 feet) wide and 150 cm (5 feet) or more long. The length depends on how much composting material you have. Do not make the rectangle wider than 120 cm, as you have to be able to work on the compost without stepping on it. In rainy places, it is best to make the compost pile above the ground. In drier areas, use the pit method described later in this section.
3. Dig a shallow pit about 30 cm (1 foot) deep. Put the soil on one side, you will need it later.
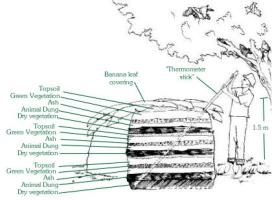
4. Begin building a compost pile by putting a bottom layer of rough materials such as maize stalks and hedge cuttings in the pit. This layer should be about 30 cm thick. Chop up any materials which are too long to improve the air circulation in the pile. Sprinkle some water on this layer.
5. Add a second layer of dry vegetation, hedge cuttings or grass. This layer should be about 15 cm thick (6 inches). Sprinkle water on this layer too. You should sprinkle water on each layer as you add it. The pile should be moist throughout.
6. Put on a third layer of animal manure. The manure contains micro-organisms which are vital for decomposition.
7. Sprinkle some ash or dust on this layer. The ashes contain valuable mineral including potassium, phosphorus, calcium and magnesium. The ashes also neutralise the acids produced during decomposition, especially by the animal manure.
8. The next layer should be green leaves from high-protein leguminous trees like Calliandra, Leucaena and Sesbania. You can also use hedge cuttings of plants like Tithonia.
9. Sprinkle on a little topsoil or old compost. The topsoil contains bacteria which are useful in the decomposition process.
 |
| Composting |
| © Reproduced from Sustainable Agriculture Extension Manual (IIRR) |
11. To complete the pile, cover it all over with a layer of topsoil about 10 cm (4 inches) thick. This layer prevents plant nutrients from escaping from the compost pile. Lastly, cover the whole with dry vegetation such as banana leaves to reduce moisture loss through evaporation.
12. Take a long, sharp, pointed stick and drive it in at an angle so that it passes through the pile from top to bottom. This stick will act as your "thermometer". After 3 days, decomposition will have started in the pile, and the stick will be warm when you pull it out.
13. Pull the "thermometer-stick" out from time to time to check the progress of the pile. You can also tell from the thermometer how dry or wet the pile is: it should be moist but not wet.
14. Sprinkle water on the pile occasionally (about every 3 days, depending on the weather). If it has been raining, you may not need to water the pile.
15. After 2-3 weeks, turn the pile over. Do not add any fresh materials except water. You must turn the pile if the "thermometer-stick" is cold when you pull it out, or if it has a white substance on it, as this shows that decomposition has stopped. Turning the pile is important because it mixes the different layers, making the decomposition faster and more complete.
16. The compost should be ready after 4 weeks. Check the temperature of the pile to make sure. If the stick feels warm when you pull it out, the pile is still decomposing and the compost is not ready. Finished compost should have a fresh, earthy smell and should contain no grass, leaves, or animal manure.
17. You can store compost by covering it with a layer of banana leaves or polythene.
Well-decomposed compost should be applied at the rate of 20 t/ha (8 t/acre): about two large hoefuls per square metre, or enough to barely cover the ground with a layer 1 cm (0.4 inch) thick.
 |
| Composting |
| © Reproduced from Sustainable Agriculture Extension Manual (IIRR) |
Pit method
The pit method of making compost conserves moisture, so it is useful in areas with low rainfall and a long dry season. Do not use it in wet areas, as the compost may become waterlogged.
1. Dig a pit 1.2 m (4 feet) wide and 0.6 m (2 feet) deep, and as long as you need for the amount of materials you have.
2. Build a pile in the pit, using the same method as in the pile method (see above).
3. Add a layer of wood ash (if available) along with urine and mud.
4. Next spread a 5cm layer of bedding with cattle dung and soil. Sprinkle with water until moist.
5. Continue adding layers until the material is 30 cm above ground level. Apply water. The heap will shrink as it decomposes.
6. Turn over the heap three times. Moisten with water each time. Decomposition needs proper mixing as well as circulation of water and air. You can ensure this by turning over the material three times:
- First turning: 10-15 days after filling the pit
- Second turning: 15 days later
- Third turning: after 2 months.
Information Source Links
- Aglearn.net, the Network for Sustainable Agriculture, Thailand. Vegetable IPM Course. www.aglearn.net
- FAO (1987). Soil Management: Compost Production and Use in Tropical and Sub-Tropical Environments. FAO Soils Bulletin 56, Rome, Italy. www.fao.org
- Inckel, M., de Smet, P., Tersmette, T. and Veldkamp, T. (1994). The Preparation and Use of Compost. Agromisa, Agrodok-series 8, CTA, Wageningen, The Netherlands. ISBN: 90- 72746-52-X
- International Federation for Women in Agriculture (IFWA) / International Institute of Rural Reconstruction (IIRR) 1999: Enviornmentally sound technologies for women in agriculture.
- International Institute of Rural Reconstruction (IIRR). Sustainable Agriculture Extension Manual. Available at www.iirr.org Accessed on 9.8.2007