Word XP
Working with Columns
Creating Columns Using the Columns Dialog Box
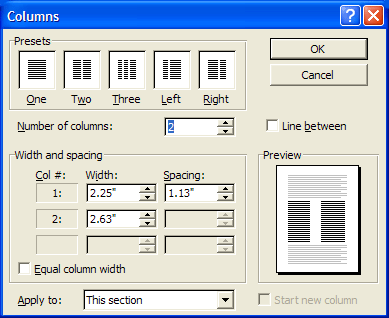
Using the Column Dialog Box versus the Columns Button will give you much more control and precision over your column structure. The Columns Dialog Box will also give you a few more column options, including Left and Right columns as well as the ability to create up to eight columns per page.
Using the Column Dialog Box:
- Switch to Print Layout View.
- To make equal columns, move the insertion point to the end of the text and insert a continuous section break by choosing Insert Break Continuous.
- Select the text you want to change to columns.
- Click Format on the Menu Bar.
- Select Columns from the menu list. The Columns Dialog Box appears.

The Column Dialog Box gives you the following options:
- Presets - Click a box to choose a preset number of columns
- Number of Columns - Use the up and down arrow keys to select between one and eight columns
- Line Between -Places lines between your columns
- Width and Spacing - Offers features that allow you to specify an exact number for the height and width of your columns, as well as the spacing between your columns.
- Equal Column Width - Check this checkbox if you want columns to be the same width
- Apply to: - Allows you to create columns out of the selected text, the selected section, this point forward, or the entire document
- Select your options and Click OK.
To Move Text into the Next Column:
- Move the insertion point in front of the text you want to move.
- Choose Format
 Columns. The Columns dialog box opens.
 - Choose "From this point forward" in the Apply to: control.
- Click the Start New Column check box to move the text to the next column.


