PowerPoint 2003
Formatting a Text Box
Formatting a text box
You can easily format a text box and modify elements such as the background color, line style and width, size, and position of the text box.
To insert a text box:
- Select Insert
 Text Box from the main menu. Your mouse pointer will change shape.
 - Click and drag your mouse to create the text box.
- Release the mouse button. The text box will appear.
It is easiest to format a text box once you have entered text into it because you can see how it will appear on the slide.
To format a text box:
- Right-click the text box.
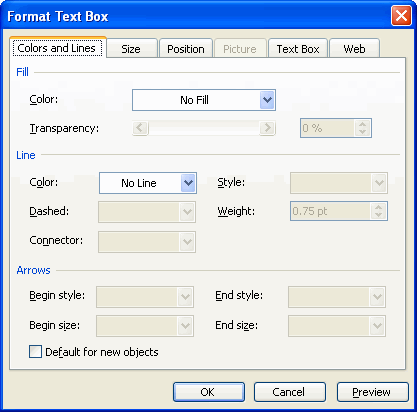
- Select Format Text Box from the drop-down menu. The Format Text Box dialog box will appear.

To format colors and lines:- Select the Colors and Lines tab.
- Select the fill color from the drop-down menu. This color will appear as the background color of the text box.
- Select the line color from the drop-down menu.
- Select the line style from the drop-down menu.
- Select the line width from the Line Weight drop-down menu.
- Decide whether you would like to use a dashed line, then make your selection from the Dashed drop-down menu in the Line section.
- Click OK to apply your selections.
To format size:- Select the Size tab.
- Enter the text box height.
- Enter the text box width.
- Enter the degree amount to rotate the text box.
- Click OK to apply your selections.
 You can use your mouse to drag the corner of the text box and extend its size if your text box does not need to be a specific size.
To format position:- Select the Position tab.
- Enter the Horizontal position on the slide.
- Enter the Vertical position on the slide.
- Select whether to anchor the text box to the top, left corner, or center.
- Click OK to apply your selections.
 You can use your mouse to move the text box on the slide; however, the Position tab allows you to control the precise location of the text box. This is extremely useful when you need a text box to appear in the same location on multiple slides.


