Word XP
Working with Pictures
Inserting Clip Art
Word comes bundled with hundreds of Clip Art images that are copyright free and available for your personal use. The clip art images that are available through Word cover many different categories and can really help enhance your pages. If you have never inserted clip art before, Word will ask if you would like to catalog all of the available resources (clip art, sound and video files) on your computer. It is a good idea to go ahead and catalog all of these free resources.
To Insert Clip Art:
- Place the insertion point where you want to insert the clip.
- Click Insert on the Menu Bar.
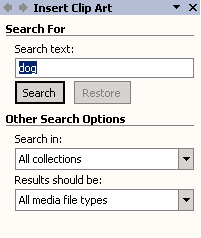
- Select Picture and then Clip Art from the cascading menu. The Insert Clip Art menu opens on the Task Pane.
- Type a keyword in the Search Text: field.
- Click Search.
AND
- Specify your search by using the Other Search Options.
- Search in: - specifies where Word will search for clip art. As long as the check box for Everywhere is checked, Word will search through All Collections.
- Results should be: - specified what type of file Word will search for (video, audio, photographs, clip art). As long as the check box for All Media Types is checked, Word will search through All Media Files.
- Double-click the clip art or picture to add to the document.


 To change your Search For text: Click the Modify button below the clip art results
 To preview video and sound clips, click the appropriate tab and click the Play button to preview the file.
To Delete a Picture:
- Select the image (click on it).
- Press the delete key on your keyboard.


