Office XP Basics
Dialog Boxes and Wizards
Dialog boxes in detail
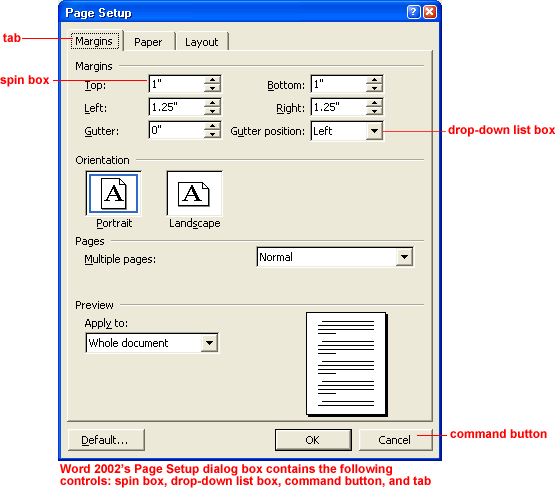
Below is an example of an Office XP dialog box.

Dialog boxes can contain the following types of controls:
 Tabs
Tabs
Tabs look like file folder tabs. Tabs let you switch between windows of information. When you click a tab, a window of new information appears.
 Command buttons
A command button, such as OK and Cancel, tells the computer to carry out an action. Execute an action by clicking a command button.
 Option buttons
Option buttons appear when you are shown a list of choices, and you need to select only one option. To select an option, click inside the circle next to your choice. When selecting an option, a small black dot fills the circle.
 Check boxes
Check boxes appear when selecting more than one option. To select an option, click inside the box. When selecting an option, a check mark appears in the box.
 Text boxes
A text box provides space to type information. For example, when naming a file you type the name into a text box.
 Drop-down list boxes
A drop-down list box shows only one option at a time (the option that is selected), and there is a downward arrow at the right end of the box. To view the entire list of options, click the arrow. Select an option from a list of choices, and click a command button to execute the command.
 Spin boxes
A spin box is used to set a value, such as the number of copies to print. To increase or decrease the number, click the up or down arrow.
 List boxes
A list box usually is a large white space that contains a list of options. If the list of option is too long to fit in the list box, a vertical scroll bar lets you view the entire list.
 Sliders
A slider looks like a sliding volume control on a radio. A slider sets a value within a continuous range of values, such as from slow to fast. To move a slider, place the mouse pointer on the slider, left-click it, then drag it from side to side.


