Word XP
Identifying Parts of the Word Window
Introduction
Microsoft Word XP is the word processing application in the Microsoft Office suite. Create professional-looking, formatted text documents with this powerful word processing software.
By the end of this lesson, you should be able to:
- Identify the parts of the Word XP window
- Change the document view
- Operate the drop-down menus
- Identify the task pane
The basics of the Word window
Let's briefly review the basic parts of the Word XP window before we move onto word processing.
Shown below is the Microsoft Word default window. When Word is launched, a new blank document—or default window—opens in Print Layout view. Although window elements are fully explained in our Windows course, here is a brief explanation of the Word window.
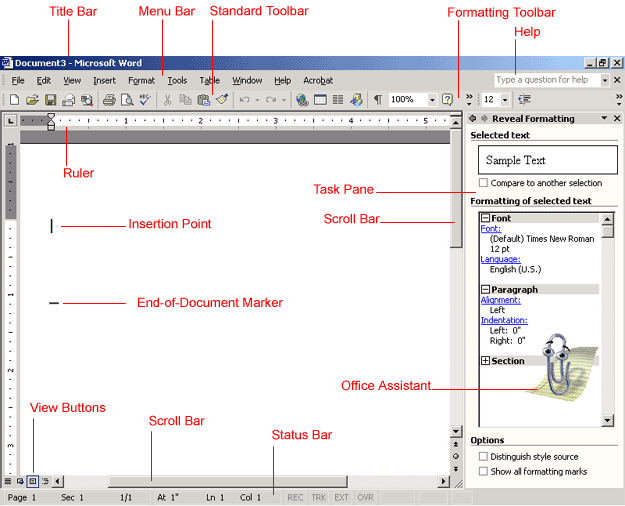
Title bar
This displays the document name followed by a program name.
Menu bar
This contains a list of options to manage and customize documents.
Standard toolbar
This contains shortcut buttons for the most popular commands.
Formatting toolbar
This contains buttons used for formatting.
Ruler
This is used to set margins, indents, and tabs.
Insertion point
This is the location where the next character appears.
End-of-document marker
This indicates the end of the document.
Help
This provides quick access to Help topics.
Scroll bars
These are used to view parts of the document.
Status bar
This displays the position of the insertion point and working mode buttons.
Task pane
This provides easy access to commonly used menus, buttons, and tools.
View buttons
These change the layout view of the document to normal, web layout, print layout, and outline view.
Office Assistant
This links to the Microsoft Office Help feature.
Change in view
In an effort to provide various ways in which to view your work in progress and remain organized, Word XP offers five views for your document. The five views are normal, print layout, web layout, outline, and full screen.
Normal view is best used for typing, editing, formatting and proofreading. It provides a maximum amount of space without rulers or page numbers cluttering your view.
Web Layout view shows what your text will look like on a webpage.
Print Layout view shows what your document will look like when it is printed. Under Print Layout view, you can see all elements of the page. Print Preview shows you this as well.
Outline view is used to create and edit outlines. Outline view only shows the headings in a document. This view is particularly handy when making notes.
Full Screen view displays ONLY the document you are working on. All other pieces of the Word window are removed except for one button that allows you to close the view screen.
Changing your document view:
- Click View on the menu bar.
- Select the view of your choice.
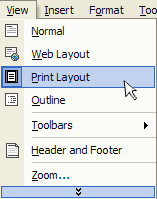
OR - Click one of the four buttons at the bottom-left of your Word window (View Full Screen is not available in this location).

Drop-down menus
Each Office XP program features a menu bar. The menu bar is made up of different menus. Each menu contains commands that enable you to work within the program.
If you have used a previous version of Microsoft Word, you may notice that the menu bar in Word XP operates slightly differently than before.
Word XP uses drop-down menus that initially display commands users most often need.
Operating the new drop-down menus
To open a menu:
- Click a menu name on the menu bar.
- View the commands listed under the drop-down menu.
- With the menu open, drag the mouse pointer to a command and click it to select the command. (As you drag your mouse pointer over the commands, each command is highlighted in light blue.)
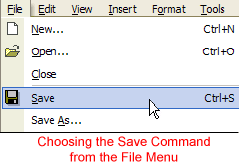
- If there is a small black triangle next to a command, hover the mouse pointer over the command with the triangle and a cascading menu with additional options will appear. Point and click to make a selection from the cascading menu.
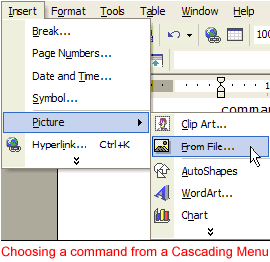
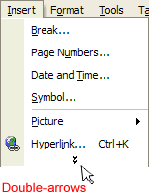
- Commands that are not used often in XP are initially hidden from the viewer. If you do not see all of the commands on a menu, click the double arrows at the bottom of the drop-down menu. You can also double-click the menu to expand it.
Using the task pane
The task pane is new in Word XP. When opened, the task pane will appear on the right side of the Word window. The task pane provides easy access to commonly used menus, buttons, and tools. By default, the task pane will appear when Word XP is first launched.
If you do not see your task pane, you can view it by either selecting certain commands or by manually opening it.
To open the task pane:
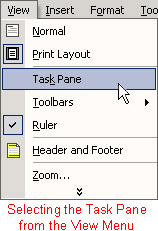
- Click View in the menu bar.
- Select Task Pane.
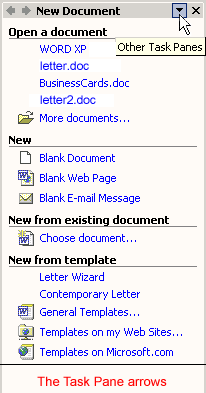
Along the top bar of the task pane, you should see small backward and forward buttons on the left, as well as a down arrow on the right. To view different task panes available to you, click the down arrow. Once you have opened different task panes, you can navigate them by clicking the left and right arrow button on the left. To close your task pane, click the X symbol on the far-right of the bar.

Challenge!
- Start Word.
- Create a new document from the task pane.
- Type the following: "This lesson taught me the basics of the Word XP window."
- Change the document view to Web Layout View.
- Exit Word without saving.


