Word 2003
Working with Columns
Introduction
By the end of this lesson, you should be able to:
- Change column structure
Working with columns
Displaying information in columns gives you more options for displaying different types of information on a page while remaining easy for viewers to read. Certain kinds of information are best displayed using columns. Newspapers, newsletters, flyers, reports, announcements, school projects, and other types of publications often use Word's column feature.
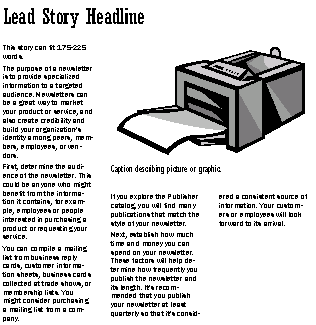
Below is an example of a newsletter using columns and a graphic:

Working with columns can be challenging, but with practice you'll have columns mastered in no time. An approach we'll first try will be to enter text into a single column and then convert it into multiple columns.
Create columns using the Columns button:
- Switch to Print Layout view.

- To make equal columns, move the insertion point to the end of the text, then insert a continuous section break by choosing Insert
 Break
Break Continuous.


- Select the text you want to change to columns.
- Click the Columns button on the Standard toolbar.
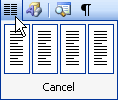
- The Columns button will expand to give you four column options:

- Choose one of the options to format your text into columns.
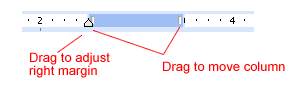
You can adjust the spacing and alignment of the columns by using the Ruler. Drag the right margin, left margin, and right indent using your mouse until the columns appear the way you want.

To enter a title that spans a column:
- Enter the title at the beginning of the first column.
- Select the title.
- Click the Columns button on the Standard toolbar, and drag to select number of columns.
Creating columns using the Columns dialog box
Using the Column dialog box versus the Columns button will give you much more control and precision over your column structure. The Columns dialog box will also give you a few more column options, including left and right columns, as well as the ability to create up to eight columns per page.
Using the Column dialog box:
- Switch to Print Layout view.
- To make equal columns, move the insertion point to the end of the text, then insert a continuous section break by choosing Insert Break Continuous.
- Select the text you want to change to columns.
- Click Format on the menu bar.
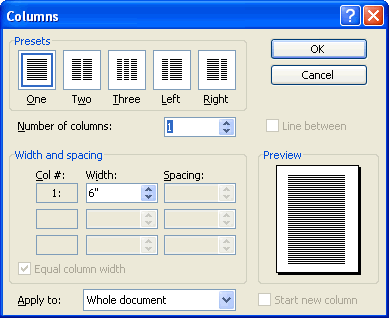
- Select Columns from the menu list. The Columns dialog box appears.

The Column dialog box gives you the following options:
- Presets: Click a box to choose a preset number of columns.
- Number of Columns: Use the up and down arrow keys to select between one and eight columns.
- Line Between: Place lines between your columns.
- Width and Spacing: Here, you can specify an exact number for the height and width of your columns, as well as the spacing between your columns.
- Equal Column Width: Click this check box if you want columns to be the same width.
- Apply to: This allows you to create columns out of the selected text, the selected section, this point forward, or the entire document.
To move text into the next column:
- Move the insertion point in front of the text you want to move.
- Choose Format
 Columns. The Columns dialog box opens.
 - Choose From this point forward in the Apply to: control.
- Click the Start New Column check box to move the text to the next column.
Challenge!
Now that you've learned about columns, do you see a need for them in your document? If you are designing a newsletter, you will almost certainly want to use them. Columns can make your newsletter look more professional. If you are designing a flyer, you may or may not want columns.
- Open your document.
- Add columns if you would like to.
- Save and close Word.