Word 2000
Tables
Introduction
By the end of this lesson, learners should be able to:
- Construct tables
- Enter text into tables
Working With Tables
You have learned how to present information in parallel columns using tabs and columns in Word. Using Word's Tables feature, you can format, edit, delete, and move text without affecting the rest of your document.
It's easier to know how many columns and rows you need before you create a table.
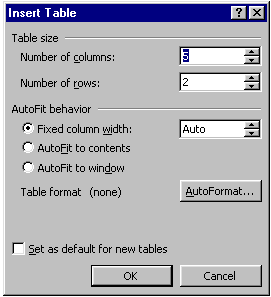
Creating Tables Using the Insert Table Dialog Box:
- Choose Table
 Insert
Table from the menu bar.
The Insert Table dialog box appears. - Determine the number of columns and rows you need in your table. You can add more later, but save yourself some work. You can always add rows by pressing Tab at the end of a row.
- To create a table as wide as your page, leave the Fixed Column Width setting on Auto.
- Click OK. A table is inserted into your document.

Creating Tables
Creating Tables Using the Insert Table Button on the Standard toolbar:
- Click the Insert Table Button.

- Now, drag the number of columns and rows you want in your table.
Creating Tables Using the Draw Tables Button:
- Click the Draw Tables button on the Tables
and Borders toolbar. The mouse pointer turns into a pencil.

- Drag the pencil to create a rectangle about the size of the table you want.
- Release the mouse button. The border of the table appears in your document.
- Use the pencil again to draw in column and row borders.
- Click the Draw Table button again to change the pencil back into an I-beam.

Entering Text
Click inside a table cell to begin entering information.
![]()
Moving Around in a Table:
- Use the Tab key or right arrow key to move right.
- Use Shift + Tab or the left arrow key to move left.
- The up and down arrow keys will move the insertion point above or below its current location.
Selecting Text in Tables:
A cell: triple click inside cell.
A row: Move mouse to left of margins, point to the row, and click.
Multiple rows: Select the first row, click and drag the number of rows desired.
A column: Move the mouse above the column. It turns into a downward pointing arrow. Click once.
Multiple columns: Select the first column, click and drag the number of columns desired.
Entire Table: Choose Table![]() Select Table from the menu bar.
Select Table from the menu bar.
Challenge!
- Open a new Word document.
- Create a table using one of the three ways mentioned in this lesson.
- Insert some text into the table.
- Practice moving the insertion point around the table.
- Delete the table.