Facebook 101
Adjusting Your Privacy Settings
Introduction
Even if you're an experienced Facebook user, modifying your privacy settings for the first time can be a little confusing. And because Facebook can change these options without much notice, it's important to review your privacy settings periodically. We'll talk about many of the privacy settings on Facebook, explaining how they work and why they're important.
Before continuing with this lesson, you may want to check out our lesson on Understanding Facebook Privacy to learn the basics.
Using Facebook's privacy settings
However you use Facebook, it's important to choose the privacy settings that will work best for you. Facebook offers two main ways to control your privacy:
- You can apply privacy settings that set general rules about who can contact you and view your information.
- You can control who sees every individual thing you share.
Privacy Shortcuts
The fastest way to change your privacy settings is to use the Privacy Shortcuts. To access the Privacy Shortcuts, click the Privacy Shortcuts button on the toolbar. From there, you can modify the audience selector, choose your Message Filtering settings, and more.
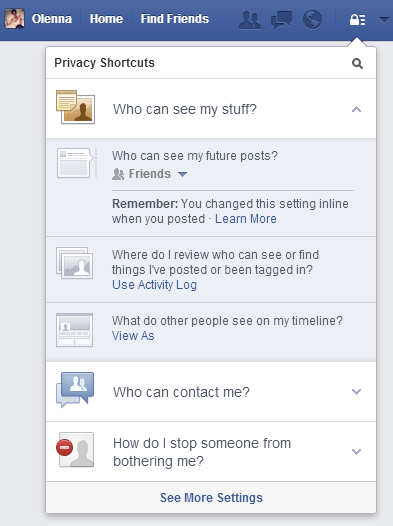
If you're using the mobile app, tap the Menu button  and select Privacy Shortcuts.
The Privacy Settings and Tools page
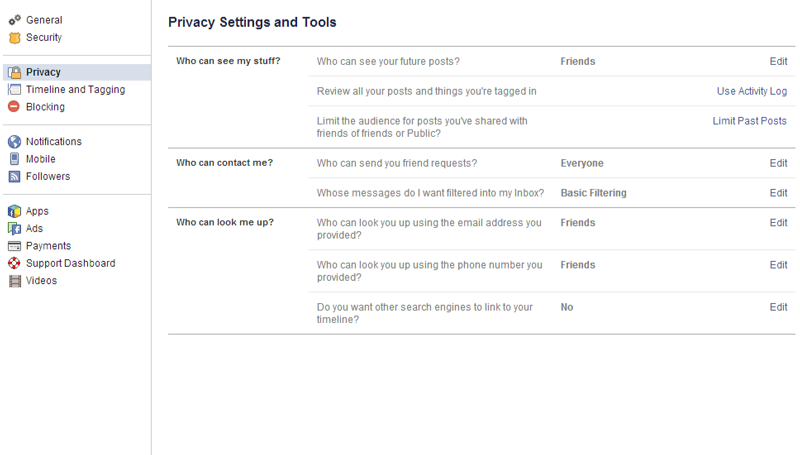
Any changes you make from the Privacy Shortcuts will be reflected on the Privacy Settings and Tools page. This is where you can control some of the most important privacy settings on Facebook.
To access the Privacy Settings and Tools page:
- Click the drop-down arrow on the Toolbar, then select Settings.
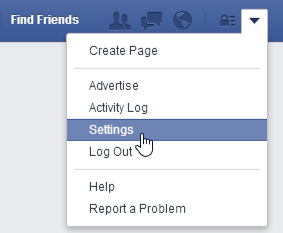
- The settings page will appear. Next, select Privacy. The Privacy Settings and Tools page will appear.

If you're using the mobile app, tap the Menu button  and select Settings
  Privacy.
Click the buttons in the interactive below to learn more about using the Privacy Settings and Tools page.
Search Engine Indexing
By default, the public information on your Timeline, including your name and profile picture, is available to search engines like Google and Bing. This makes it easier for people to find your profile. If you're not comfortable with this, make sure this setting is turned off.
This setting does not affect any of your other privacy settings. For example, if you've made your photos only available to friends, this will not make them public.

Search Preferences
People who aren't already your friends on Facebook can find you by searching for your contact information, such as your email address or phone number.
We recommend setting these to Everyone so that your real-life friends can find you easily.

Limit Past Posts
If you've been on Facebook for a while, many of your posts may actually be public. You can use this setting to limit your past posts so that only your friends will be able to view them.

Use Activity Log
From here, you can access the Activity Log, which allows you to review things that you've shared, along with posts you've been tagged by your friends, such as a photo or status update.

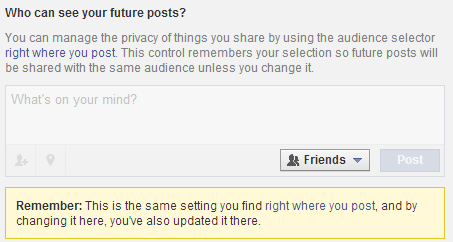
Who can see your future posts?
You can use the audience selector to control who can view your future posts, including status updates and photos. While some people may want to share everything publicly, we recommend that you choose Friends or Custom.
You'll also be able to set the audience selector whenever you share something on Facebook.
Message filtering
Here, you can set your filtering preferences for your Messages inbox. We recommend that you use Basic Filtering. The Strict Filtering option may accidentally send messages from friends to the Other folder, which is basically like a Spam folder.

Who can send you friend requests?
Here, you can choose whether to receive friend requests from everyone on Facebook or only friends of your current friends. We recommend that you set this to Everyone so your real-life friends can find you on Facebook.

The audience selector
In addition to your overall privacy settings, you can control who sees every thing you share with the audience selector. This allows you to change your default privacy settings and make things more private or less private. If you change your mind later, you can go back and change the privacy level for that post at any time.
To use the audience selector:
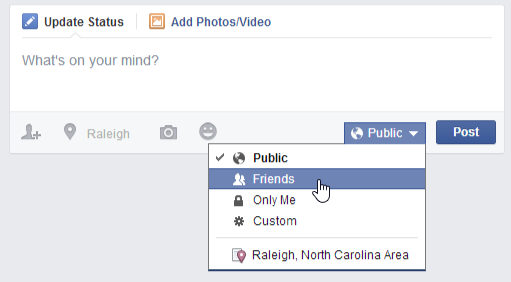
You'll see the audience selector across different parts of Facebook, such as the Publisher and the Timeline. In this example, we'll use the audience selector on the Publisher to share a status update.
- Click the audience selector.

- Choose the desired audience. In this example, we'll choose Public.
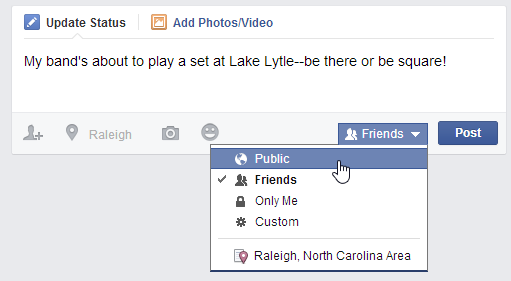
- Click Post to share with the selected audience.
Keep in mind that modifying the audience selector will change the default audience setting for future posts. You should always double-check the audience selector before sharing anything on Facebook.
Timeline and tagging settings
A tag is a way to identify people on Facebook by posting their names and a link to their individual Timelines. Your friends can tag you in photos, as well as in other posts, including status updates. Anyone who can see these posts will be able to click the tag and view your Timeline. The tagged post will also be visible on your Timeline, your News Feed, and your friends' feeds.
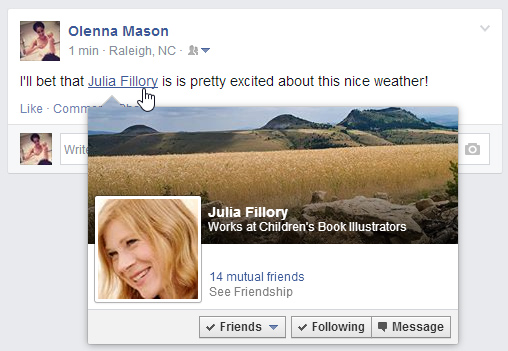
While tags make it easy to connect with your friends on Facebook, your friends may occasionally tag you in posts you don't want to share. One way to prevent yourself from being tagged in potentially embarrassing photos and posts is to manage your tagging settings.
To access these settings, navigate to the settings page and then select Timeline and Tagging. If you're using the mobile app, tap the Menu button  and select Settings
  Timeline and Tagging.
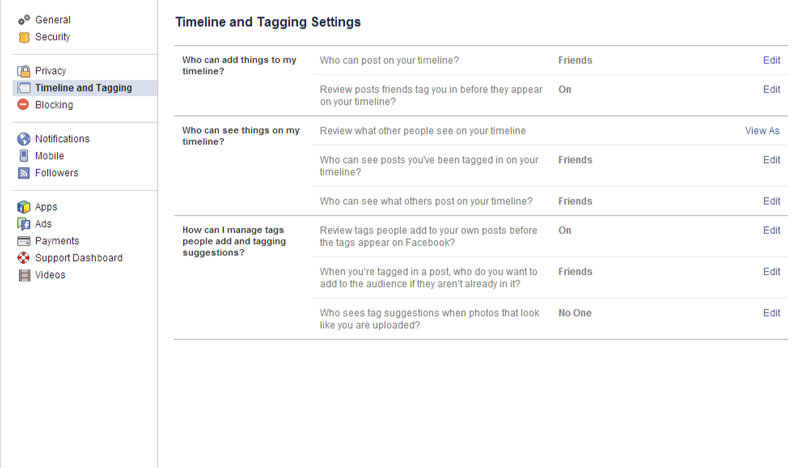
Click the buttons in the interactive below to learn about your Timeline and Tagging settings.
Tag Suggestions
When Tag Suggestions are turned on, Facebook will try to identify you in your friends' photos to suggest that they tag you. While Facebook does use facial recognition technology to make these suggestions, this feature will not tag you automatically or identify you to people who aren't your friends.
Still, if you wish to turn off Tag Suggestions for privacy reasons, select No One.

Add Audience for Tag
By default, this option is set to Friends. Whenever you're tagged in a post, you and your friends will be able to see the post, even if your friends are not friends with the original poster.
For example, if one of your friends shares a photo with her friends and tags you in the photo, her friends and your friends will be able to see the tag. If you don't want all of your friends to be included, change this setting to Only Me.

Review Tags
When your friends comment on the things you share, like posts and photos, they can tag themselves and others. Tag Review allows you to review these tags before they're added to your posts, and then choose to approve or reject them.
Whenever someone is tagged in your posts, that person and their friends will be able to see it, even if you aren't friends with the person who was tagged. For this reason, we strongly recommend that you set Tag Review to Enabled.

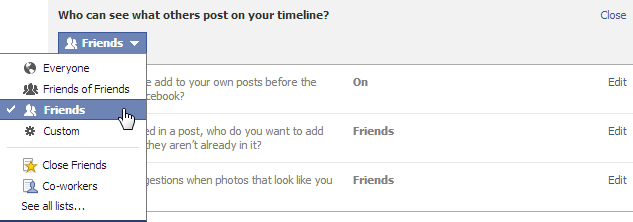
View Friends' Posts Permissions
By default, this option is set to Friends of Friends, meaning that you, your friends, and your friends' friends can all see posts that your friends have shared on your Timeline.
Since Friends of Friends almost certainly includes many people you don't know, we recommend changing this setting to Friends or Only Me.
View Friends' Tags Permissions
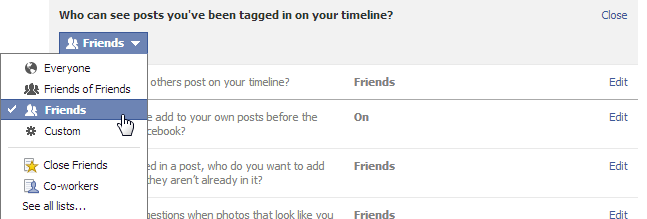
By default, this option is set to Friends of Friends, meaning that you, your friends, and your friends' friends can all see when someone else tags you in a post on your Timeline.
Since Friends of Friends almost certainly includes many people you don't know, we recommend changing this setting to Friends or Only Me.
View Profile As
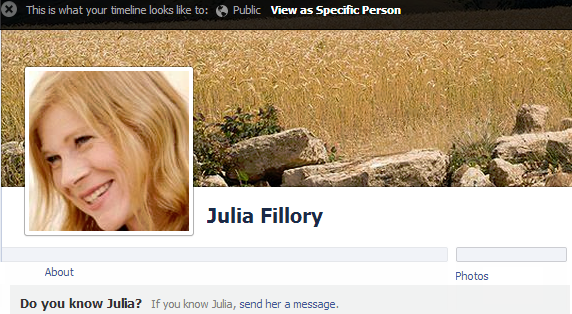
Click View As to see what your Timeline looks like when viewed by different people. For example, you can see how your Timeline would appear to your friends or people you aren't friends with. You can also click View as Specific Person to see how your Timeline will appear to a certain person.
In the image below, you can see how Julia's timeline would appear to people who aren't friends with her. Most of her information is shared only with friends, so just her name and profile picture are visible.
Timeline Review
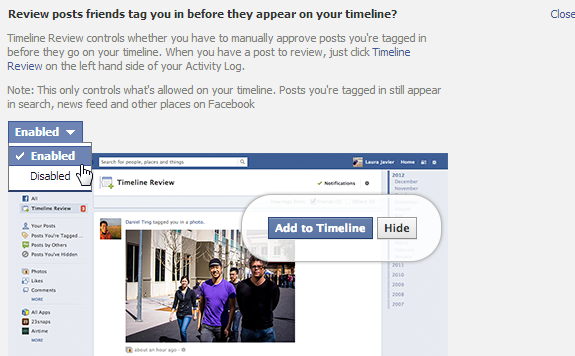
When you enable Timeline Review, you'll be notified whenever your friends tag you in a post or photo. You'll then have the option to approve or reject the post. Only posts you approve will appear on your Timeline.
We recommend turning on this setting so you can review posts before they appear on your Timeline.
Timeline Permissions
Your Timeline is where people can post links, photos, and more.
By default, all friends can post to your Timeline. We recommend leaving this set to Friends so your friends can post on your Timeline.
However, if you don't want anyone else to be able to post on your Timeline, you can change this setting to No One.

The Activity Log
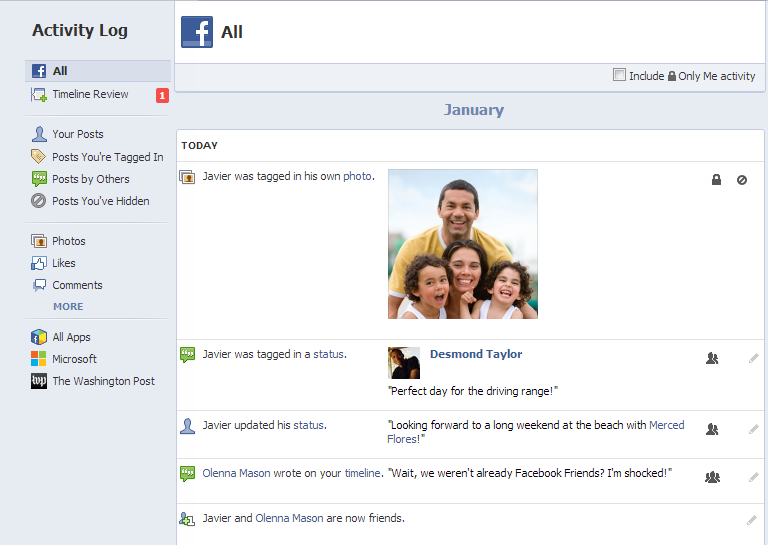
If you ever need to review or modify what you've posted in the past, you can use the Activity Log. Every action you make on Facebook—from posts to comments to likes—is recorded in the Activity Log. From there, it's easy to review your past activity. You'll also be able to manage posts your friends have shared on your Timeline, including the option to hide posts.
- To access your Activity Log, navigate to your Timeline, then select Activity Log. If you're using the mobile app, tap the Menu button
 and select Activity Log.
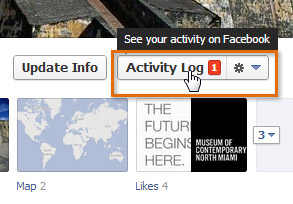
Click the buttons in the interactive below to learn more about using the Activity Log.
Recent App Activity
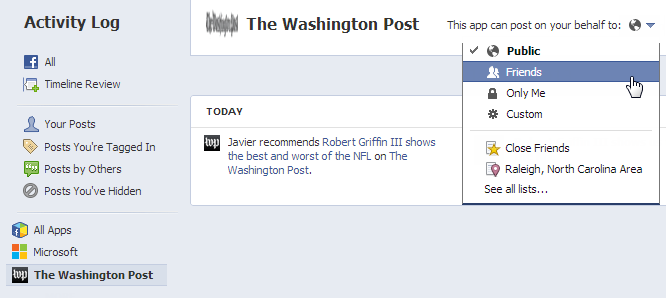
Here, you can review what your apps have posted to your Timeline, such as recent recommendations or game activity. You can even set the audience level for each app to control who can see future app activity on your Timeline.
Photos, Likes, and Comments
Here, you can review recently tagged photos of you, as well as your recent likes and comments.
You can also choose to hide likes from your Timeline if you don't want to share this information with your friends.

Timeline Review
Here, you can approve posts from your friends before they appear on your Timeline using Timeline Review.
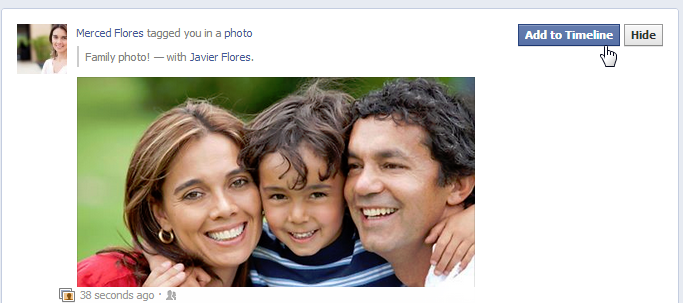
Posts
Here, you can review any post that you've made using the Publisher, posts your friends have shared on your Timeline, and any posts you've hidden from your Timeline.
We recommend checking the Posts You're Tagged In and Posts by Others sections on occasion to make sure you know what your friends are sharing on your Timeline.
Hide Posts
Sometimes, you may want to hide a post from your Timeline. Simply click the Edit button next to any post in your Activity Log and then select the desired option from the drop-down menu.
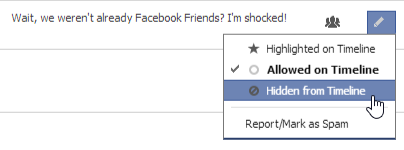
Only Me Activity
As indicated by the lock icon, any posts that you've shared with Only Me will be hidden from your Timeline automatically.
All Facebook Activity
Here, you can review all of your activity on Facebook, including your recent updates and anything your Friends have posted to your Timeline.
This option will be selected whenever you open the Activity Log.
Audience Selector
You can always change the privacy level for your own past posts using the audience selector, just as you would when using the Publisher.
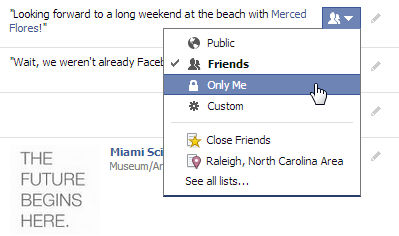
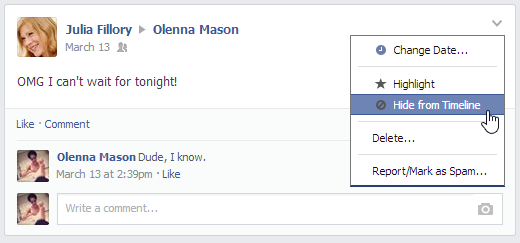
You call also hide and delete posts directly from your Timeline. Simply click the drop-down arrow, then select the desired option.
Apps and games privacy
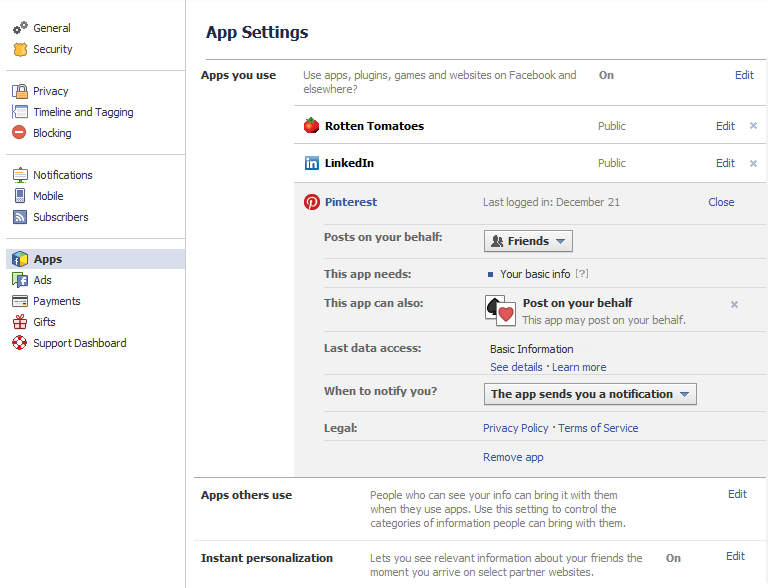
The Apps settings page contains general settings that apply to the apps, games, and websites you've connected with Facebook. These include controls that let you:
- Prevent your friends from sharing information about you when they connect with an app
- Disable the instant personalization feature, which shares your public information with partner websites
- Turn off all platform apps and websites
You can also modify detailed settings for individual apps. While these settings do give you some control over your privacy, keep in mind that all apps require you to provide at least a few pieces of personal information. Many apps even require that you let them share updates about your app activity. Before continuing to use an app, we recommend reviewing the app settings carefully to decide if you're comfortable sharing the requested information.
To access these settings, navigate to the settings page, then select Apps. If you're using the mobile app, tap the Menu button  and select Settings
  Apps.
Apps.
Click the buttons in the interactive below to learn more about customizing your app settings.
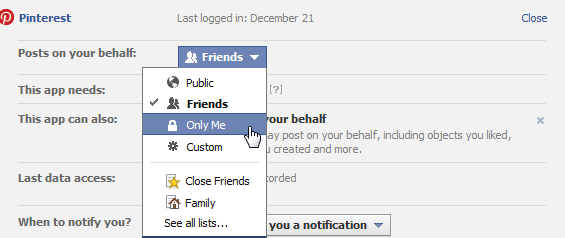
Posting Audience
Some apps have permission to create posts on your behalf. You can choose the audience for those posts here. If you prefer not to share app activity with your friends, we recommend choosing Only Me.
App Requirements
All apps require that you provide them with certain personal information. Here, you can see exactly what information the app requires.
Turn Off Platform Apps
If you're uncomfortable with the idea of apps accessing data from your Facebook account, you can choose to turn off all platform apps.
Turning off apps will also disconnect your account from any websites you've connected. Once apps are turned off, they'll no longer be able to access your information. However, you won't be able to use them anymore.

Instant Personalization
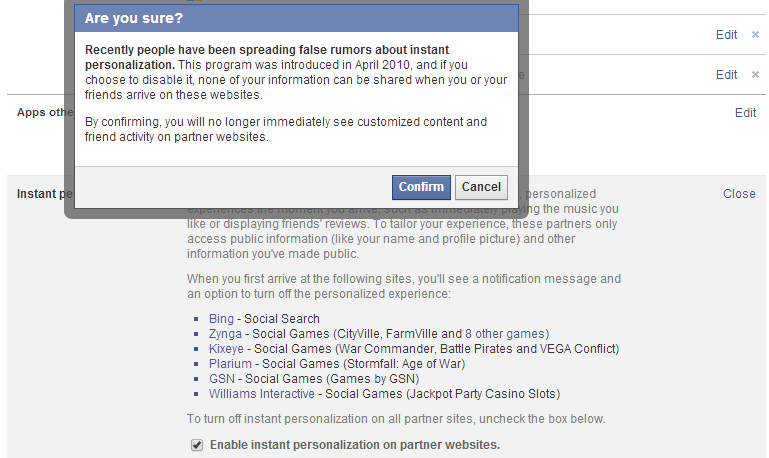
Instant Personalization helps other websites personalize your experience when you visit these pages while signed in to Facebook. They do this by using your public information to predict what you'll find interesting.
Sites that use Instant Personalization do not automatically share your information or post to your Timeline. However, if you feel uncomfortable with other websites viewing the information you've made public, you can disable Instant Personalization by unchecking the box and then clicking Confirm.
Apps Others Use
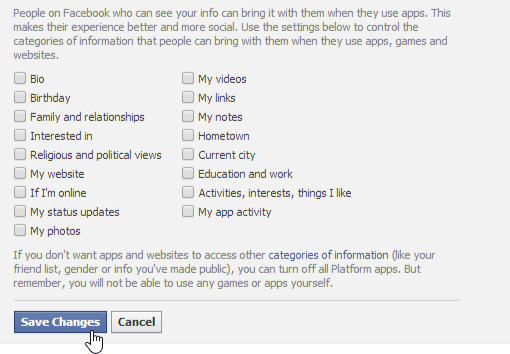
Even if you don't use any apps, the apps your friends use can access some of your personal information. Here, you can see what information your friends' apps can access.
We recommend that you uncheck every box to prevent your friends from sharing information about you with the apps they use.
Remove App
Not all app settings and permissions can be changed. If you're uncomfortable with the information and permissions an app requires, click Remove app to remove it from your account.
A dialog box will appear, confirming that you want to remove the app. Be sure to check the box to remove any information the app has stored, then click Remove.

App Permissions
Here, you'll see a list of the actions you've agreed to let the app perform with your account. Click the X next to an action to remove it from the list of permitted actions.
In this example, all of the app's actions can be removed. However, you may find that certain actions are required by some apps and cannot be removed.

Edit App Permissions
Click Edit to modify permissions for any app.
App Data Settings
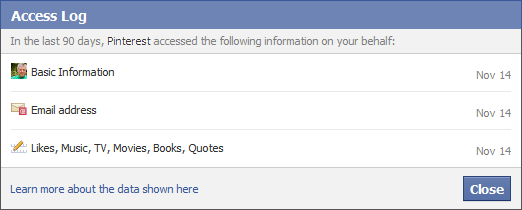
Here, you can see what personal information the app has viewed from your account and when. Click See details to see exactly what information has been shared with the app.
App Notifications
By default, all apps can send you notifications. Some apps may not ever send you a notification, but if they become intrusive or annoying, you can always disable app notifications by changing the setting to Never.

Apps You Use
A list of the apps you've installed or linked to your Facebook account will appear here.
Blocking unwanted communication
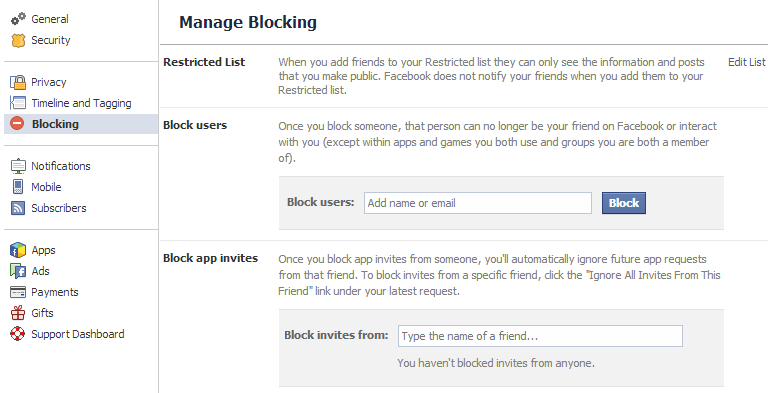
If you want to stop certain people from bothering you on Facebook, you can block them. When you block someone, that person can no longer communicate with you or send friend requests.
To access these settings, navigate to the settings page, then select Blocking. If you're using the mobile app, tap the Menu button  and select Settings
  Blocking.
From here, you can block users from contacting you on Facebook. Just enter the name of the person you want to block, then click Block. You can also block entire applications if you wish to stop receive invitations to certain apps and games.
Advertisements and your privacy
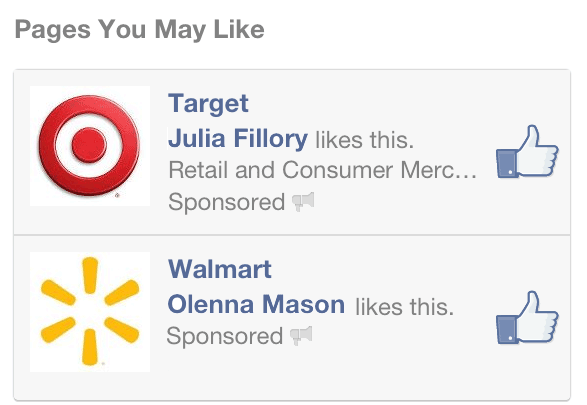
By default, Facebook is allowed to use your information and activity in advertisements on Facebook. For example, a game can use your profile picture and game activity in ads to encourage your friends to play. Whenever you like something on Facebook, businesses can use this information to advertise to your friends, as in the example below:
Keep in mind that Facebook's advertising policies are complicated and can change without much notice. If you're not comfortable sharing this information with advertisers, we recommended that you block ads from accessing and displaying your information.
To block Facebook Ads from using your information:
- Navigate to the settings page, then click Ads.
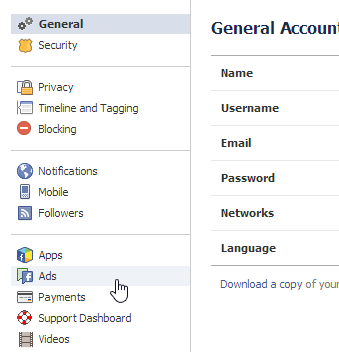
- The Facebook Ads page will appear. Click Edit in the Third Party Sites section.
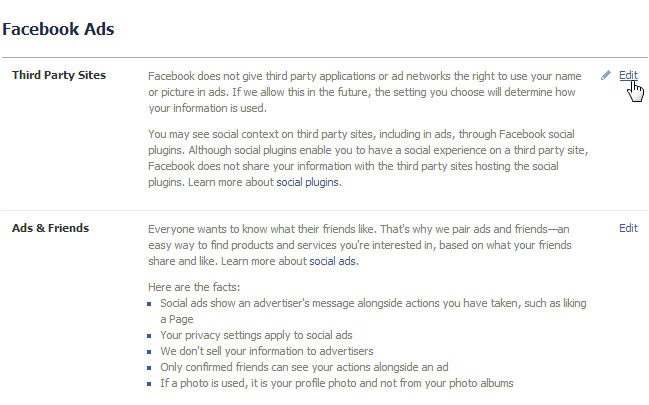
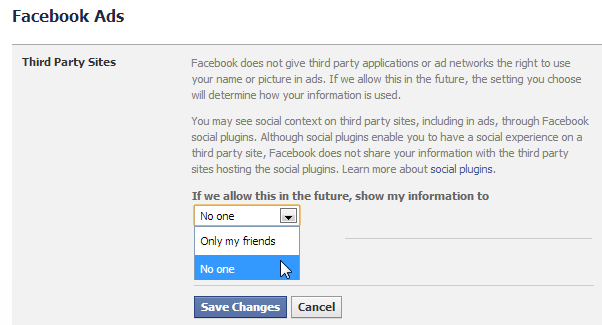
- Click the drop-down arrow and select No one, then click Save Changes. This will prevent advertisers from using your public information in their advertisements.
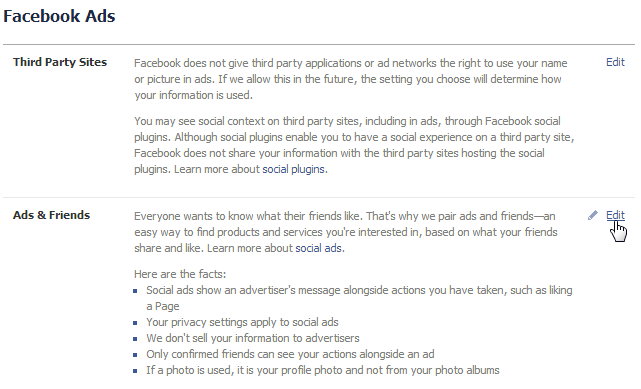
- Click Edit in the Ads and Friends section.
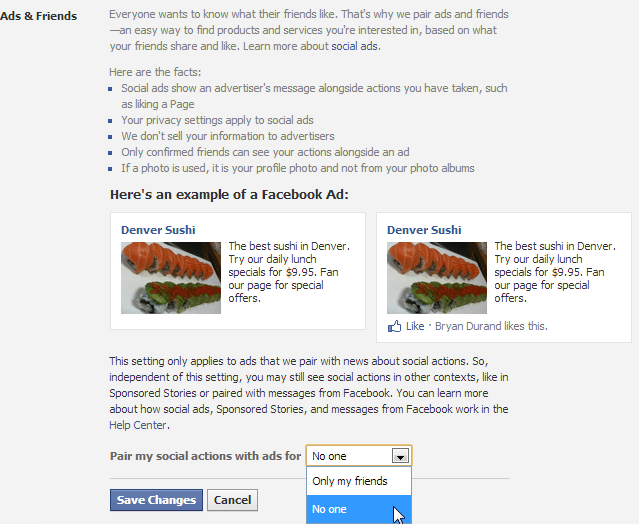
- Select No one from the drop-down menu, then click Save Changes. This will prevent advertisers from using your likes and interests to tailor advertisements to your friends.
- Locate and select Digital Advertising Alliance in the Website and Mobile App Custom Audiences section.
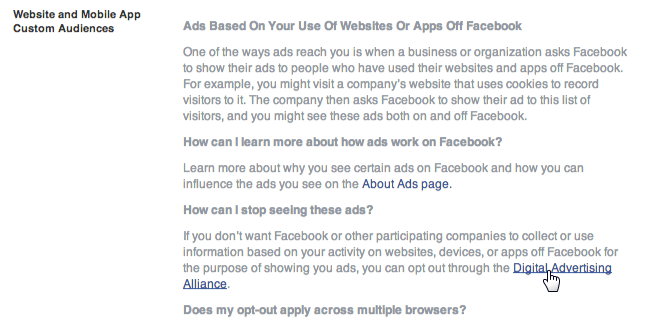
- The Digital Advertisiting Alliance Opt Out page will appear. Choose your desired opt out options.
- Facebook will no longer be able to use your information for advertisements.


