Excel XP
Identifying Basic Parts of the Excel Window
Introduction
Microsoft Excel XP is a spreadsheet application in the Microsoft Office Suite. A spreadsheet is an accounting program for the computer. Spreadsheets are primarily used to work with numbers and text. Spreadsheets can help organize information, like alphabetizing a list of names or ordering records, or calculate and analyze information using mathematical formulas.
By the end of this lesson, students should be able to:
- Identify the parts of the Excel window
- Understand the differences between a Workbook and a Worksheet
- Understand a cell and its importance to Excel
- Move around a workbook
The Excel Window
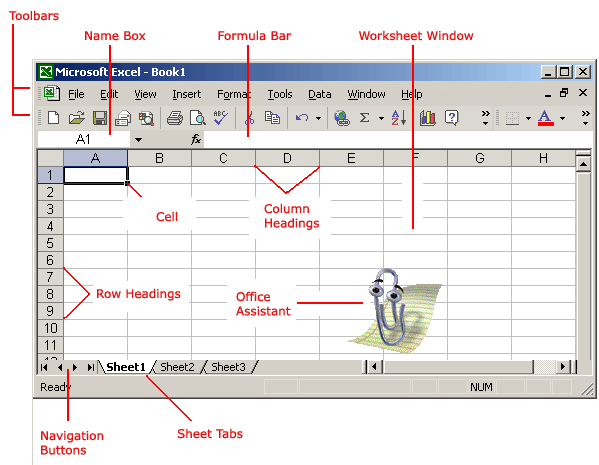
Many items you see on the Excel XP screen are standard in most other Microsoft software programs like Word, PowerPoint and previous versions of Excel. Some elements are specific to Excel XP.

Workbook
Also called a spreadsheet, the Workbook is a unique file created by Excel XP.
Title bar

The Title bar displays both the name of the application and the name of the spreadsheet.
Menu bar

The Menu bar displays all the menus available for use in Excel XP. The contents of any menu can be displayed by clicking on the menu name with the left mouse button.
Toolbar
Some commands in the menus have pictures or icons associated with them. These pictures may also appear as shortcuts in the Toolbar.
![]()
Column Headings

Each Excel spreadsheet contains 256 columns. Each column is named by a letter or combination of letters.
Row Headings

Each spreadsheet contains 65,536 rows. Each row is named by a number.
Name Box

Shows the address of the current selection or active cell.
Formula Bar

Displays information entered-or being entered as you type-in the current or active cell. The contents of a cell can also be edited in the Formula bar.
Cell

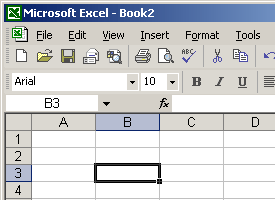
A cell is an intersection of a column and row. Each cell has a unique cell address. In the picture above, the cell address of the selected cell is B3. The heavy border around the selected cell is called the cell pointer.
Navigation Buttons and Sheet Tabs

Navigation buttons allow you to move to another worksheet in an Excel workbook. Used to display the first, previous, next or last worksheets in the workbook.
Sheet tabs separate a workbook into specific worksheets. A Workbook defaults to three worksheets. A Workbook must contain at least one worksheet.
Workbooks and Worksheets
A Workbook automatically shows in the workspace when you open Microsoft Excel XP. Each workbook contains three worksheets. A worksheet is a grid of cells, consisting of 65,536 rows by 256 columns. Spreadsheet information--text, numbers or mathematical formulas--is entered in the different cells.

Column headings are referenced by alphabetic characters in the gray boxes that run across the Excel screen, beginning with the Column A and ending with Column IV.
Rows are referenced by numbers that appear on the left and then run down the Excel screen. The first row is named Row 1 and the last row is named 65536.
 Important Terms
- A workbook is made up of three worksheets.
- The worksheets are labeled Sheet1, Sheet2, and Sheet3.
- Each Excel worksheet is made up of columns and rows.
- In order to access a worksheet, click on the tab that says Sheet#.
The Cell
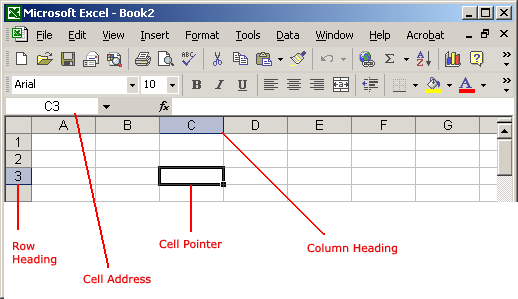
An Excel worksheet is made up of columns and rows. Where these columns and rows intersect, they form little boxes called cells. The active cell, or the cell that can be acted upon, reveals a dark border. All other cells reveal a light gray border. Each cell has a name. Its name is comprised of two parts: the column letter and the row number.

In the following picture the cell C3, formed by the intersection of column C and row 3, contains the dark border. It is the active cell.

 Important Terms
- Each cell has a unique cell address composed of a cell's column and row.
- The active cell is the cell that receives the data or command you give it.
- A darkened border, called the cell pointer, identifies it.
Moving around the worksheet
You can move around the spreadsheet in several different ways.
To Move the Cell Pointer:
- To activate any cell, point to a cell with the mouse and click.
- To move the pointer one cell to the left, right, up, or down, use the keyboard arrow keys.
To Scroll Through the worksheet:
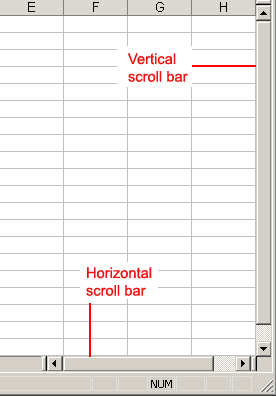
The vertical scroll bar located along the right edge of the screen is used to move up or down the spreadsheet. The horizontal scroll bar located at the bottom of the screen is used to move left or right across the spreadsheet.

The PageUp and PageDown keys on the keyboard are used to move the cursor up or down one screen at a time. Other keys that move the active cell are Home, which moves to the first column on the current row, and Ctrl+Home, which moves the cursor to the top left corner of the spreadsheet or cell A1.
To Move between worksheets
As mentioned, each Workbook defaults to three worksheets. These worksheets are represented by tabs-named Sheet1, Sheet2 and Sheet3-that appear at the bottom of the Excel window.
To Move from one worksheet to another worksheet:
- Click on the sheet tab (Sheet1, Sheet2 or Sheet 3) that you want to display

Challenge
- Display the contents of every menu in the menu bar and note the icons associated with specific menu choices. Then, try and find the pictures or shortcuts in the standard toolbar.
- Click on each of the three worksheet tabs-Sheet1, Sheet2 and Sheet3-to become familiar moving from sheet-to-sheet in the workbook.
- Page Up (PgUp) and Page Down (PgDn) to get used to scrolling in a worksheet.
- Use the horizontal and vertical scrollbars to practice scrolling up, down, left and right in the worksheet.