Excel 2007
Starting a Workbook
Introduction
 You will need to know how to insert text and numbers into Excel workbooks to be able to use it to calculate, analyze, and organize data. In this lesson, you will learn how to create a new workbook, insert and delete text, navigate a worksheet, and save an Excel workbook.
Your first workbook
Watch the video! (5:13min)
To create a new, blank workbook:
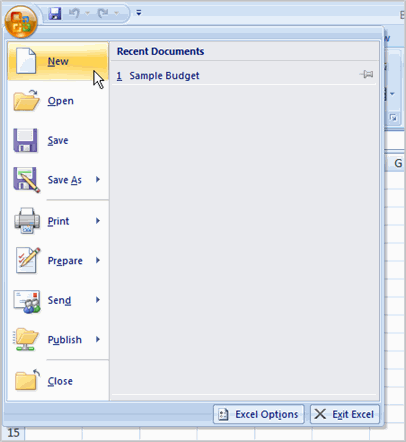
- Left-click the Microsoft Office Button.
- Select New. The New Workbook dialog box opens, and Blank Workbook is highlighted by default.
- Click Create. A new, blank workbook appears in the window.
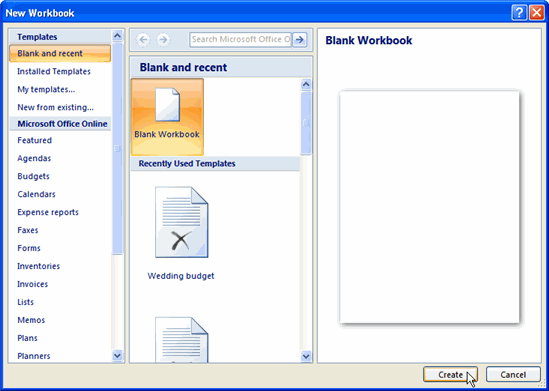
When you first open Excel, the software opens to a new, blank workbook.
To insert text:
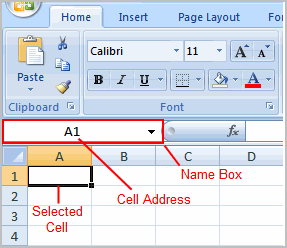
- Left-click a cell to select it. Each rectangle in the worksheet is called a cell. As you select a cell, the cell address appears in the Name Box.
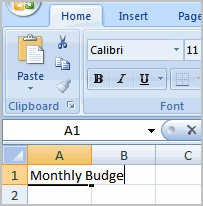
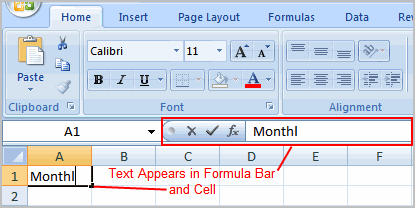
- Enter text into the cell using your keyboard. The text appears in the cell and in the formula bar.
Cell addresses
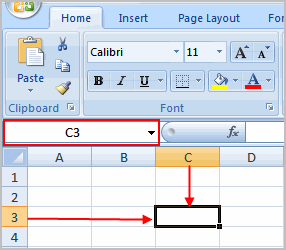
Each cell has a name, or a cell address, based on the column and row where it is located. For example, this cell is C3 because it is where column C and row 3 intersect.
You can also select multiple cells at the same time. A group of cells is known as a cell range. Rather than a single cell address, you will refer to a cell range using the cell addresses of the first and last cells in the cell range, separated by a colon. For example, a cell range that included cells A1, A2, A3, A4, and A5 would be written as A1:A5.
If the columns in your spreadsheet are labeled with numbers instead of letters, you'll need to change the default reference style for Excel. Review our Extra on What are Reference Styles? to learn how.
To edit or delete text:
- Select the cell.
- Press the Backspace key on your keyboard to delete text and make a correction.
- Press the Delete key to delete the entire contents of a cell.
You can also make changes to and delete text from the formula bar. Just select the cell, then place your insertion point in the formula bar.
To move through a worksheet using the keyboard:
- Press the Tab key to move to the right of the selected cell.
- Press the Shift key then the Tab key to move to the left of the selected cell.
- Use the Page Up and Page Down keys to navigate the worksheet.
- Use the arrow keys.
To save the workbook:
- Left-click the Microsoft Office Button.
- Select Save or Save As.
- Save As allows you to name the file and choose a location to save the spreadsheet. Choose Save As if you'd like to save the file for the first time or if you'd like to save the file as a different name.
- Select Save if the file has already been named.
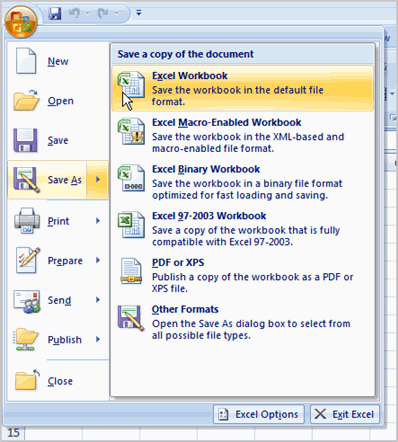
You can save a workbook in many ways, but the two most common ones are as an Excel Workbook, which saves it with a 2007 file extension, and as an Excel 97-2003 Workbook, which saves the file in a compatible format so people who have earlier versions of Excel can open the file.
Compatibility mode
Sometimes you may need to work with workbooks that were created in earlier versions of Microsoft Excel, such as Excel 2003 or Excel 2000. When you open these kinds of workbooks, they will appear in Compatibility mode.
Compatibility mode disables certain features, so you'll only be able to access commands found in the program that was used to create the workbook. For example, if you open a workbook created in Excel 2003, you can only use tabs and commands found in Excel 2003.

If you want access to all features of Excel 2007, you can save the workbook in the Excel 2007 file format.
To exit Compatibility mode:
- Click the Microsoft Office Button.
- Select Save As
 Excel Workbook.

Challenge!
- Open Excel.
- Create a new, blank workbook.
- Practice entering text into cells.
- Practice deleting text using the Backspace and Delete keys.
- Navigate the sheet using the Tab key.
- Save the spreadsheet.


